Unified Model
Ozone redistribution
Overview
The ozone redistribution (OR) scheme for GC3.1 (CMIP6) is described in a paper by Hardiman, 2019. The Met Office also have documentation for a how the OR works in a suite.
These instructions are for adding OR to a GC3.1 suite on Archer2. The standard GC5 workflows have been updated to support OR on Archer2 (from UM 13.9). You may find it easier to use the reference suite as a starting point, rather than adding OR to your suite.
| Suite | Config | Description | UM version | Met O suite |
|---|---|---|---|---|
| u-as037/ozone_redistribution | GC3.1 | N96-ORCA1 PI Control for CMIP6 | 10.7 | u-ar766 |
| u-da412 | GC5 | N216 ORCA025 present day control with Gregorian calendar | 13.9 | u-da412 |
Note that u-da412 is setup for the internal Met Office machine by default. To run on Archer2 follow these instructions.
Ozone redistribution in a suite
See also the Met Office ozone redistribution documentation linked above.
The OR requires several new tasks to be added to the suite, and changes made to some existing tasks. The diagram below shows the graph of a suite which includes OR.
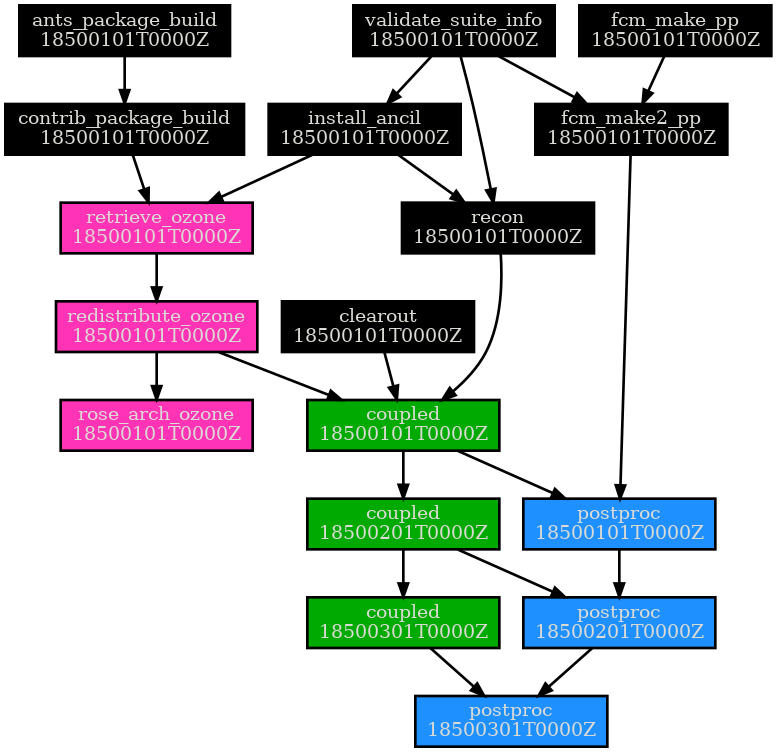
coupled: As the model runs, data required for the OR is written to a monthlyp4file:(0, 253) DENSITY*R*R AFTER TIMESTEP (30, 453) Height at Tropopause Levelpostproc: The monthlyp4files are then gathered into an annualpofile for use by the OR code.retrieve_ozone: This runs at the start of the year before the model and checks that input data required for the OR code are available. The scheme requires data from the previous 1 or 2 years of the simulation, which may be from archived data. Source data is symlinked into a directory:share/data/ozone_redistribution. If no data is available, the OR scheme will not be run for the first year.redistribute_ozone: Runs the redistribution code, creating a new ozone ancillary file for use in the next year of the simulation in:share/data/etc/ozonerose_arch_zone: Archives the newly created ancillary file and clears out theshare/data/ozone_redistributiondirectory.coupled: When the subsequent model task runs it will use the updated ozone ancillary file.
Adding ozone redistribution to a suite.
1. Upgrade postproc
Make sure postproc is using version 2.4, and if necessary set up JASMIN transfer. Test that this works correctly before proceeding to the next step.
2. Checkout the reference suite.
For GC3.1 the reference suite is u-as037/ozone_redistribution.
rosie co u-as037/ozone_redistribution
3. Copy in the OR configuration files
Copy these apps from the reference suite into the corresponding location in your suite:
app/ants_package_build/*
app/contrib_package_build/*
app/redistribute_ozone/*
app/retrieve_ozone/*
app/rose_arch_ozone/*
Copy in these files:
app/postproc/opt/rose-app-ozone.conf
app/um/opt/rose-app-ozone.conf
meta/ozone/rose-meta.conf
ozone_redistribution.rc
site/archer2_ozone.rc
site/archer2_python_env
4. Add in the include files and suite variables.
- Open
meta/rose-meta.confand add the following line to the top of the file:import=meta/ozone - In
rose-suite.confadd the following lines to the top of the file:
[file:bin/retrieve_files.sh]
source=fcm:moci.xm_br/dev/annetteosprey/postproc_2.4_archer2_ozone/Utilities/ozone_redistribution/retrieve_files.sh

[file:bin/retrieve_ozone_data.py]
source=fcm:moci.xm_br/dev/annetteosprey/postproc_2.4_archer2_ozone/Utilities/ozone_redistribution/retrieve_ozone_data.py
- Then add the following lines to the list of variables (we will configure these settings in the next step):
OROG_ANCIL='\${UMDIR}/ancil/atmos/n96e/orca1/orography/globe30/v6/qrparm.orog'
OZONE_ANCIL_INITIAL='\${CMIP6_ANCILS}/n96e/timeslice_1850/OzoneConc/v1/mmro3_monthly_CMIP6_1850_N96_edited-ancil_2anc'
OZONE_HOST='archer2'
OZONE_PRIMARY_ARCHIVE=''
OZONE_REDISTRIBUTE=true
OZONE_SECONDARY_ARCHIVE=''
OZONE_SKIP_FIRST_YEAR=true
OZONE_USE_UPDATED_ANCIL=false
- In
site/archer2.rcadd the following lines to the bottom of the file:{% include 'site/' + SITE + '_ozone.rc' %} - In
suite.rc, add the following line to the bottom of the file, or above the [visualization] line if there is one:{% include 'ozone-redistribution.rc' %}
5. Configure the suite
In the rose edit GUI, under “suite conf -> Ozone redistribution”, you will find options for the OR scheme.
“Host machine for ozone redistribution” should be set to “archer2”.
Set “Initial ozone ancillary” to be your ozone ancillary file. If the file is very large and takes a long time to load in Iris, you can split it into individual years. Contact the CMS helpdesk for advice on this.
Set “Orography ancillary” to be the full path and filename for the orography ancillary file used in the suite. To work out what this is, check the
install_ancilapp and potentially the optional configs.Leave “Skip ozone redistribution in first year” as “true”, unless you have ozone files from a previous run.
If you do have archived files, specify the path to the files in “Primary archive source”, e.g.:
OZONE_PRIMARY_ARCHIVE='/work/n02/n02/annette/archive/u-as037-ozone/18520101T0000Z/as037a.po'
Additionally you may need to check the following options:
- This suite is a PI control, so the
YEARvariable inapp/redistribute_ozone/rose-app.confis set 1850. For a time-varying ozone set:YEAR=$REF_YEAR - The standard code requires you to use a 3D ozone ancillary file. If this is not already set up, then set the following variables in
app/um/rose-app.confor in the um section of therose editGUI:zon_av_ozone=.false. i_ozone_int=1You will also need to make sure and specify a 3D ozone ancil in the “Initial ozone ancillary” option above.
Check the UM output streams. By default the new
p4stream goes to a file idpp104and usage profileUP4. Inu-as037this stream already exists, so the optional config increses the number of reserved headers inapp/um/opt/rose-app-ozone.conf. If this stream does not exist you should setreserved_headers=0.- Check that the base of the archiving path in
rose_arch_ozone/opt/rose-app-archer2.confmatches the location in postprocarchive_root_path.
The OR scheme is quite complicated, and your suite may require some additional changes to get it working properly. Contact the CMS helpdesk if you need advice.
Checking the output
Follow the technical description above (link) and check that the correct links are being set up at each stage.
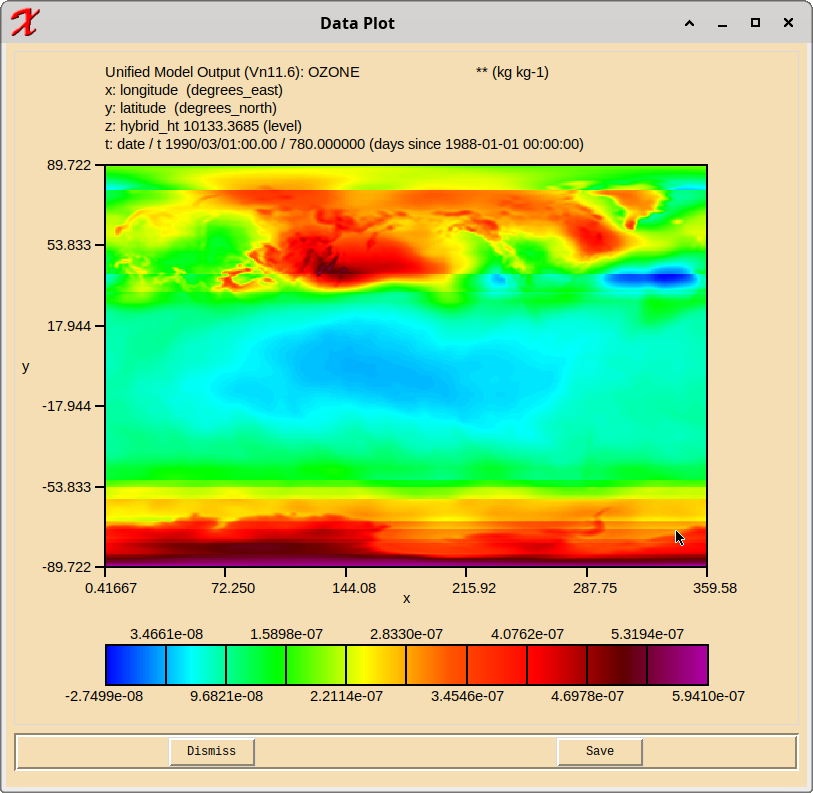
When you think that you have the scheme working, take a look the output dump from a cycle when OR is active to ensure that the correct ozone ancil is being read in by the model. The ozone at heights ~10000 should look like the image below. (For PI runs it may be around height ~9000.) There should be some horizontal banding added in by the OR; if there’s no banding, then something’s gone wrong somewhere.